Cách tự tạo Bot ChatGPT bằng Next.js và OpenAI API.
Xây dựng ứng dụng ChatGPT với Next.js, TypeScript và TailwindCSS.
Yêu cầu:
- Cài đặt Node.js và npm trên máy của bạn.
- Hiểu biết cơ bản về React và TypeScript.
- Có API key của OpenAI – bạn có thể đăng ký tài khoản và tạo ra một API key từ trang web của OpenAI.
Bạn sẽ được gì sau khi đọc qua hướng dẫn này:
Theo hướng dẫn này, mình sẽ hướng dẫn các bạn sử dụng API của OpenAI để tạo ra một ứng dụng chat bot đơn giản giống y như ChatGPT.
Bước 1: Thiết lập dự án
Đầu tiên, chúng ta sẽ sử dụng Next.js Starter Kit từ Apideck để thiết lập dự án một cách nhanh hơn. Vì starter kit này được cài đặt sẵn TypeScript, TailwindCSS và thư viện Apideck Components.
Tiếp theo các bạn tạo một dự án mới bằng dòng lệnh:
yarn create-next-app --example https://github.com/apideck-io/next-starter-kitChọn tên dự án và điều hướng đến thư mục mới của bạn. Bên trong, tạo một tệp .env.local ở thư mục gốc và thêm dòng sau (thay thế YOUR_OPENAI_API_KEY bằng API key của bạn):
OPENAI_API_KEY=YOUR_OPENAI_API_KEYBước 2: Viết API client
Để không bị lộ OpenAi API key, chúng ta sẽ tạo một API endpoint thay vì thực hiện các yêu cầu trực tiếp đến API từ trình duyệt. Làm theo các bước sau để thiết lập endpoint của bạn bằng cách sử dụng Next.js API Routes:
- Định vị thư mục pages của dự án của bạn và tạo một thư mục con mới có tên là api.
- Bên trong thư mục api, tạo một tệp TypeScript mới có tên là createMessage.ts
- Trong tệp createMessage.ts, bạn có thể sử dụng SDK của OpenAI hoặc tạo một request HTTP đến API của OpenAI để tạo ra một tin nhắn mới cho “cuộc trò chuyện” của bạn với chat bot. Trong hướng dẫn này, mình sẽ sử dụng cách call API trực tiếp.
Đây là đoạn code cho API Route:
import { NextApiRequest, NextApiResponse } from 'next'

export default async function createMessage(
  req: NextApiRequest,
  res: NextApiResponse
) {
  const { messages } = req.body
  const apiKey = process.env.OPENAI_API_KEY
  const url = 'https://api.openai.com/v1/chat/completions'

  const body = JSON.stringify({
    messages,
    model: 'gpt-3.5-turbo',
    stream: false,
  })

  try {
    const response = await fetch(url, {
      method: 'POST',
      headers: {
        'Content-Type': 'application/json',
        Authorization: `Bearer ${apiKey}`,
      },
      body,
    })
    const data = await response.json()
    res.status(200).json({ data })
  } catch (error) {
    res.status(500).json({ error: error.message })
  }
}
Đối với ví dụ này, mình sử dụng mô hình GPT-3.5-turbo, vì nó hiện đã có sẵn vào thời điểm viết bài. Nếu bạn có quyền truy cập vào GPT-4, bạn có thể thay đổi giá trị theo ý muốn.
Giá trị messages là một mảng chứa các tin nhắn từ cuộc trò chuyện dựa trên chat với trí tuệ nhân tạo (AI). Mỗi tin nhắn chứa cả role và content. role có thể là:
- system: Đây là lời nhắn ban đầu được gửi đến AI, cung cấp cho nó hướng dẫn về cách hành xử.
Ví dụ: bạn có thể sử dụng “Bạn là ChatGPT, một mô hình ngôn ngữ được đào tạo bởi OpenAI.” hoặc “Bạn là một kỹ sư phần mềm phát triển các chương trình phần mềm, ứng dụng web và ứng dụng di động bằng các ngôn ngữ lập trình và công cụ phát triển khác nhau.” Thử nghiệm với các thông điệp hệ thống khác nhau có thể giúp bạn điều chỉnh hành vi của AI. - user: Đại diện cho đầu vào của người dùng.
Ví dụ: người dùng có thể hỏi “Bạn có thể cung cấp một hàm JavaScript để lấy thời tiết hiện tại không?” - assistant: Đây là phản hồi của AI, sẽ được trả về qua API endpoint.
Bước 3: Tạo các hàm nhắn tin
Bây giờ sau khi API endpoint đã sẵn sàng để giao tiếp với AI, chúng ta có thể bắt đầu thiết kế giao diện người dùng để tương tác.
Để bắt đầu, chúng ta sẽ tạo hàm sendMessage. Các bạn làm như sau:
- Tạo một tệp mới có tên sendMessage.ts trong thư mục utils.
- Thêm đoạn code sau vào sendMessage.ts:
import { ChatCompletionRequestMessage } from 'openai'

export const sendMessage = async (messages: ChatCompletionRequestMessage[]) => {
  try {
    const response = await fetch('/api/createMessage', {
      method: 'POST',
      headers: {
        'Content-Type': 'application/json',
      },
      body: JSON.stringify({ messages }),
    })

    return await response.json()
  } catch (error) {
    console.log(error)
  }
}
Với hàm này, bạn có thể thiết lập truyền thông giữa giao diện người dùng và AI thông qua API endpoint.
Bây giờ chúng ta hãy thiết lập logic để tạo tin nhắn mới trong useMessages hook.
Trong thư mục utils, tạo một tệp có tên useMessages.ts và thêm đoạn code sau:
import { useToast } from '@apideck/components'
import { ChatCompletionRequestMessage } from 'openai'
import {
  ReactNode,
  createContext,
  useContext,
  useEffect,
  useState,
} from 'react'
import { sendMessage } from './sendMessage'

interface ContextProps {
  messages: ChatCompletionRequestMessage[]
  addMessage: (content: string) => Promise<void>
  isLoadingAnswer: boolean
}

const ChatsContext = createContext<Partial<ContextProps>>({})

export function MessagesProvider({ children }: { children: ReactNode }) {
  const { addToast } = useToast()
  const [messages, setMessages] = useState<ChatCompletionRequestMessage[]>([])
  const [isLoadingAnswer, setIsLoadingAnswer] = useState(false)

  useEffect(() => {
    const initializeChat = () => {
      const systemMessage: ChatCompletionRequestMessage = {
        role: 'system',
        content: 'You are ChatGPT, a large language model trained by OpenAI.',
      }
      const welcomeMessage: ChatCompletionRequestMessage = {
        role: 'assistant',
        content: 'Hi, How can I help you today?',
      }
      setMessages([systemMessage, welcomeMessage])
    }

    // When no messages are present, we initialize the chat the system message and the welcome message
    // We hide the system message from the user in the UI
    if (!messages?.length) {
      initializeChat()
    }
  }, [messages?.length, setMessages])

  const addMessage = async (content: string) => {
    setIsLoadingAnswer(true)
    try {
      const newMessage: ChatCompletionRequestMessage = {
        role: 'user',
        content,
      }
      const newMessages = [...messages, newMessage]

      // Add the user message to the state so we can see it immediately
      setMessages(newMessages)

      const { data } = await sendMessage(newMessages)
      const reply = data.choices[0].message

      // Add the assistant message to the state
      setMessages([...newMessages, reply])
    } catch (error) {
      // Show error when something goes wrong
      addToast({ title: 'An error occurred', type: 'error' })
    } finally {
      setIsLoadingAnswer(false)
    }
  }

  return (
    <ChatsContext.Provider value={{ messages, addMessage, isLoadingAnswer }}>
      {children}
    </ChatsContext.Provider>
  )
}

export const useMessages = () => {
  return useContext(ChatsContext) as ContextProps
}
Bước 4: Thực hiện các Component UI của tin nhắn
Sau khi đã thiết lập các hàm của mình, chúng ta có thể thiết kế các thành phần (components) giao diện sẽ sử dụng các hàm này để tạo ra một giao diện trò chuyện và người dùng có thể tương tác.
Các bạn có thể làm theo các bước dưới đây:
1. Tạo một tệp mới có tên MessageForm.tsx trong thư mục components của dự án của bạn và thêm đoạn code sau:
import { Button, TextArea } from '@apideck/components'
import { useState } from 'react'
import { useMessages } from 'utils/useMessages'

const MessageForm = () => {
  const [content, setContent] = useState('')
  const { addMessage } = useMessages()

  const handleSubmit = async (e: any) => {
    e?.preventDefault()
    addMessage(content)
    setContent('')
  }

  return (
    <form
      className="relative mx-auto max-w-3xl rounded-t-xl"
      onSubmit={handleSubmit}
    >
      <div className=" supports-backdrop-blur:bg-white/95 h-[130px] rounded-t-xl border-t border-l border-r border-gray-200 border-gray-500/10 bg-white p-5 backdrop-blur dark:border-gray-50/[0.06]">
        <label htmlFor="content" className="sr-only">
          Your message
        </label>
        <TextArea
          name="content"
          placeholder="Enter your message here..."
          rows={3}
          value={content}
          autoFocus
          className="border-0 !p-3 text-gray-900 shadow-none ring-1 ring-gray-300/40 backdrop-blur focus:outline-none focus:ring-gray-300/80 dark:bg-gray-800/80 dark:text-white dark:placeholder-gray-400 dark:ring-0"
          onChange={(e: any) => setContent(e.target.value)}
        />
        <div className="absolute right-8 bottom-10">
          <div className="flex space-x-3">
            <Button className="" type="submit" size="small">
              Send
              <svg
                xmlns="http://www.w3.org/2000/svg"
                fill="none"
                viewBox="0 0 24 24"
                strokeWidth={1.5}
                stroke="currentColor"
                className="ml-1 h-4 w-4"
              >
                <path
                  strokeLinecap="round"
                  strokeLinejoin="round"
                  d="M6 12L3.269 3.126A59.768 59.768 0 0121.485 12 59.77 59.77 0 013.27 20.876L5.999 12zm0 0h7.5"
                />
              </svg>
            </Button>
          </div>
        </div>
      </div>
    </form>
  )
}

export default MessageForm
Bây giờ chúng ta đã thiết lập xong các thành phần giao diện người dùng, chúng ta cần tạo thành phần để hiển thị danh sách các tin nhắn.
2. Tạo một tệp tin mới có tên là MessagesList.tsx trong thư mục components và thêm đoạn code sau đây:
import { useMessages } from 'utils/useMessages'

const MessagesList = () => {
  const { messages, isLoadingAnswer } = useMessages()

  return (
    <div className="mx-auto max-w-3xl pt-8">
      {messages?.map((message, i) => {
        const isUser = message.role === 'user'
        if (message.role === 'system') return null
        return (
          <div
            id={`message-${i}`}
            className={`fade-up mb-4 flex ${
              isUser ? 'justify-end' : 'justify-start'
            } ${i === 1 ? 'max-w-md' : ''}`}
            key={message.content}
          >
            {!isUser && (
              <img
                src="https://www.teamsmart.ai/next-assets/team/ai.jpg"
                className="h-9 w-9 rounded-full"
                alt="avatar"
              />
            )}
            <div
              style={{ maxWidth: 'calc(100% - 45px)' }}
              className={`group relative rounded-lg px-3 py-2 ${
                isUser
                  ? 'from-primary-700 to-primary-600 mr-2 bg-gradient-to-br text-white'
                  : 'ml-2 bg-gray-200 text-gray-700 dark:bg-gray-800 dark:text-gray-200'
              }`}
            >
              {message.content.trim()}
            </div>
            {isUser && (
              <img
                src="https://www.teamsmart.ai/next-assets/profile-image.png"
                className="h-9 w-9 cursor-pointer rounded-full"
                alt="avatar"
              />
            )}
          </div>
        )
      })}
      {isLoadingAnswer && (
        <div className="mb-4 flex justify-start">
          <img
            src="https://www.teamsmart.ai/next-assets/team/ai.jpg"
            className="h-9 w-9 rounded-full"
            alt="avatar"
          />
          <div className="loader relative ml-2 flex items-center justify-between space-x-1.5 rounded-full bg-gray-200 p-2.5 px-4 dark:bg-gray-800">
            <span className="block h-3 w-3 rounded-full"></span>
            <span className="block h-3 w-3 rounded-full"></span>
            <span className="block h-3 w-3 rounded-full"></span>
          </div>
        </div>
      )}
    </div>
  )
}

export default MessagesList
Chúng ta không muốn hiển thị thông báo mặc định của hệ thống, vì vậy nếu role là system, chúng ta sẽ trả về null.
Tiếp theo, chúng ta điều chỉnh kiểu dáng của tin nhắn dựa trên role của chúng là assistant hoặc user.
Trong khi chúng ta đang chờ phản hồi, chúng ta sẽ hiển thị một phần tử Loader. Để phần tử Loader này hoạt động, chúng ta cần thêm một số CSS tùy chỉnh.
Trong thư mục styles, tạo một tệp globals.css và thêm đoạn code sau đây:
.loader span {
  animation-name: bounce;
  animation-duration: 1.5s;
  animation-iteration-count: infinite;
  animation-timing-function: ease-in-out;
}
.loader span:nth-child(2) {
  animation-delay: 50ms;
}
.loader span:nth-child(3) {
  animation-delay: 150ms;
}
Nhớ import tệp CSS vào tệp _app.tsx của bạn:
import 'styles/globals.css'
import 'styles/tailwind.css'

import { ToastProvider } from '@apideck/components'
import { AppProps } from 'next/app'
export default function App({ Component, pageProps }: AppProps): JSX.Element {
  return (
    <ToastProvider>
      <Component {...pageProps} />
    </ToastProvider>
  )
}
3. Bây giờ chúng ta có thể sử dụng các Component UI tin nhắn trong ứng dụng của mình.
Tìm thư mục trang và mở tệp index.tsx. Loại bỏ code mẫu trong tệp này và thay bằng code dưới đây:
import Layout from 'components/Layout'
import MessageForm from 'components/MessageForm'
import MessagesList from 'components/MessageList'
import { NextPage } from 'next'
import { MessagesProvider } from 'utils/useMessages'

const IndexPage: NextPage = () => {
  return (
    <MessagesProvider>
      <Layout>
        <MessagesList />
        <div className="fixed bottom-0 right-0 left-0">
          <MessageForm />
        </div>
      </Layout>
    </MessagesProvider>
  )
}

export default IndexPage
Mình đã bọc các component của mình bằng MessageProvider để chúng ta có thể chia sẻ trạng thái giữa các components.
Mình cũng đã thêm một div container vào component MessageForm để cố định vị trí của nó ở cuối trang.
Bước 5: Chạy ứng dụng chat
Vậy là xong! Chúng ta đã hoàn thành tạo một con Bot ChatGPT cơ bản và có thể xem ứng dụng chat của mình hoạt động bằng cách:
- Đảm bảo máy chủ phát triển của bạn đang chạy. (yarn dev)
- Truy cập đến URL gốc của ứng dụng của bạn trên trình duyệt của bạn. (localhost:3000)
- Bạn sẽ thấy giao diện người dùng được hiển thị trên màn hình. Nhập tin nhắn vào trường văn bản ở dưới cùng và nhấn Gửi. Trợ lý trò chuyện AI sẽ trả lời tin nhắn của bạn.
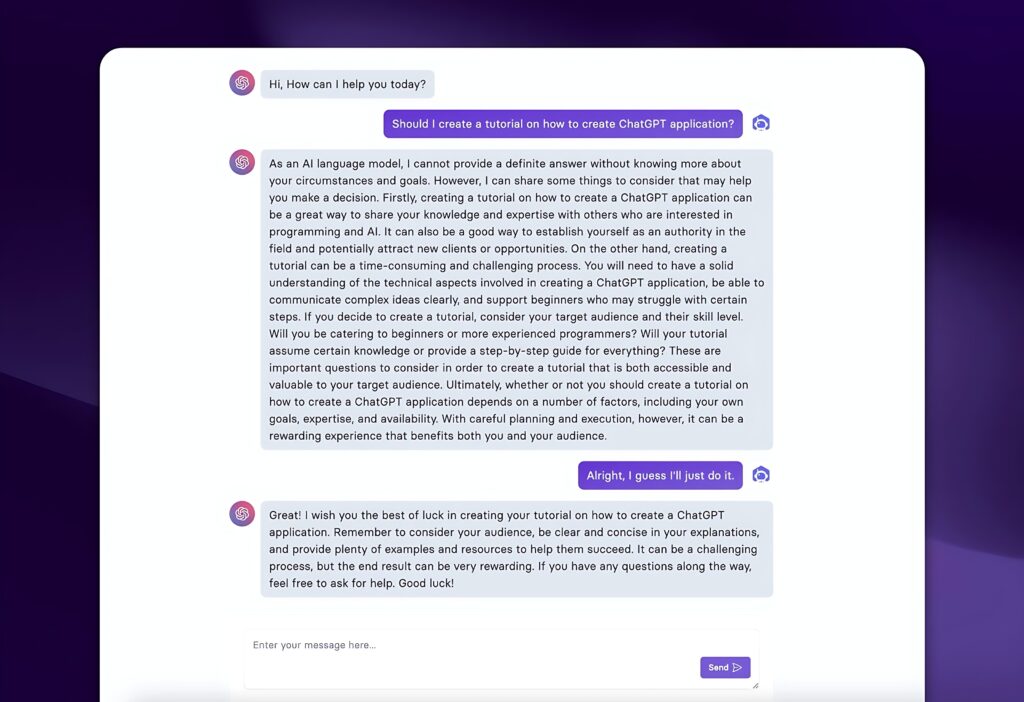
Bây giờ bạn có thể trò chuyện với trợ lý trò chuyện AI của mình! Hãy tự do thử nghiệm với các loại tin nhắn khác nhau để xem phản hồi từ “trợ lý ảo” mới của bạn như thế nào nhé!